
Posture Triangle® PEDALFITPT.COM
Posture: The Bottom Bracket of Cycling Well
It is time to actually understand posture beyond the “sit up straight” and “don’t slump” mentality. Poor posture is a combination of environmental interaction and habits that mold us into onions over time. In most cases, dysfunctional onions. What do I mean by a dysfunctional onion? Well, I mean layers and layers of restrictions that make up our smelly, sticky postural problems. When we finally start to peel away at them a few involuntary tears come to our eyes. It is time to start chipping away at them.
There is a lot of noise in the fitness community about mobility, stability and standing desks. This leads to what I like to call Forest Gumping your way into posture. Unfortunately, it is not realistic to just run out of your poor-posture-cast one day onto an Alabama football field where you go on to win a National Title. Be efficient and effective by understanding what you should actually be mobilizing and stabilizing and when to initiate such an individual prescription.
Stop bargaining with your body. Ignoring posture leads to dysfunction, dysfunction lead to injury and injury leads to time away from the bike. If you "fix" the injury without changing the underlying problem, posture, then you cycle right back into the problem. In a unique high demand sport such as cycling you accelerate the growth of the layers of your dysfunctional-onion more rapidly than with other activities. This may come as a surprise to some folks who chose cycling for the low impact nature of the sport. Of course I am a proponent of having a bike fit but this is where my service and philosophies may differ from the standard methods. Your position on the bike is only a goal if you crumble after 30 minutes in the saddle.
I developed the Posture Triangle®, shown above, to help you understand the unique demands of cycling and decide where to start in your endeavor. This is a good way for coaches, trainers, health care professionals and cyclists to communicate about posture. Let go of what you think you know and hold on tight. This is the bottom bracket of being a better rider. We all love talking about bike geometry, now it’s time to talk about our geometry.
1. Be There
Self Assessment
Awareness
Environment
Your first question should be where is "there"? I'll spare you some of the details on this post because the amount of information coming your way on neutral spine posture in the future is immense, but the concept is simple. "There" is the place where your bones are supposed to live to decrease the impact of gravity. If your bones live in the stasis that is neutral then your muscles, joints, and ligaments are not under un-natural strain and stress. If you are unable to find proper alignment then you will have unnecessary fatigue, muscular strain, tightness and in later stages, pain. Finding neutral posture is more complicated than you have traditionally been taught. It's not just a matter of sticking out your chest and jamming your shoulder blades together. In fact, that is called "military posture" and it is equally dysfunctional. Finding the balance of proper alignment will take some cognitive load and 30 minutes of your time today. Drop what you are doing and start now. Print out this post and make notes all over it. Tag us in your masterpiece @pedalfitpt on Instagram or Facebook, and enter to win a Pedal Fit session!
Self-Assessment in Standing: Day 1
My name is (______________) and I have bad posture. This week is about owning up to your flaws. You can't change them until you recognize them. Doing generic postural exercises is inefficient, learn about yourself and make the changes that are specific to you.
ASSESSING POSTURE WITH A DIY PLUMB LINE
- Gather up a few items
- A device to snap a photo
- A friend who can use the device to snap a photo
- String that is at least 1 foot longer than you
- If you have a plumb line and plumb bob you can skip the last items
- At least two pieces of tape. The type does not matter
- A key, quarter or other object to tie/tape onto the bottom of the string
- Make a plumb line by attaching one of the items to the end of the string
- Tape the plumb line in a door frame or on the ceiling for you long armed folks. The object at the end of the string should pull the line straight to indicate a straight gravity line. Just like your curtains, you want the object to just meet the floor.
- Take 3 photos in your normal posture. Do not attempt to make the corrections that you think are desired. You want a true understanding of your posture.
- SIDE VIEW: Line up the plumb line just anterior (in front) of the lateral malleolus of the ankle (prominent bone on the outside of the ankle).
- FRONT VIEW: Place your feet equidistant apart and to each side of the plumb line while facing forward.
- BACK VIEW: Place your feet equidistant apart and to each side of the plumb line while facing with your back to the line.
- BONUS: Have someone take a picture of your sitting posture at work. Or your standing desk set up.
Side View Assessment

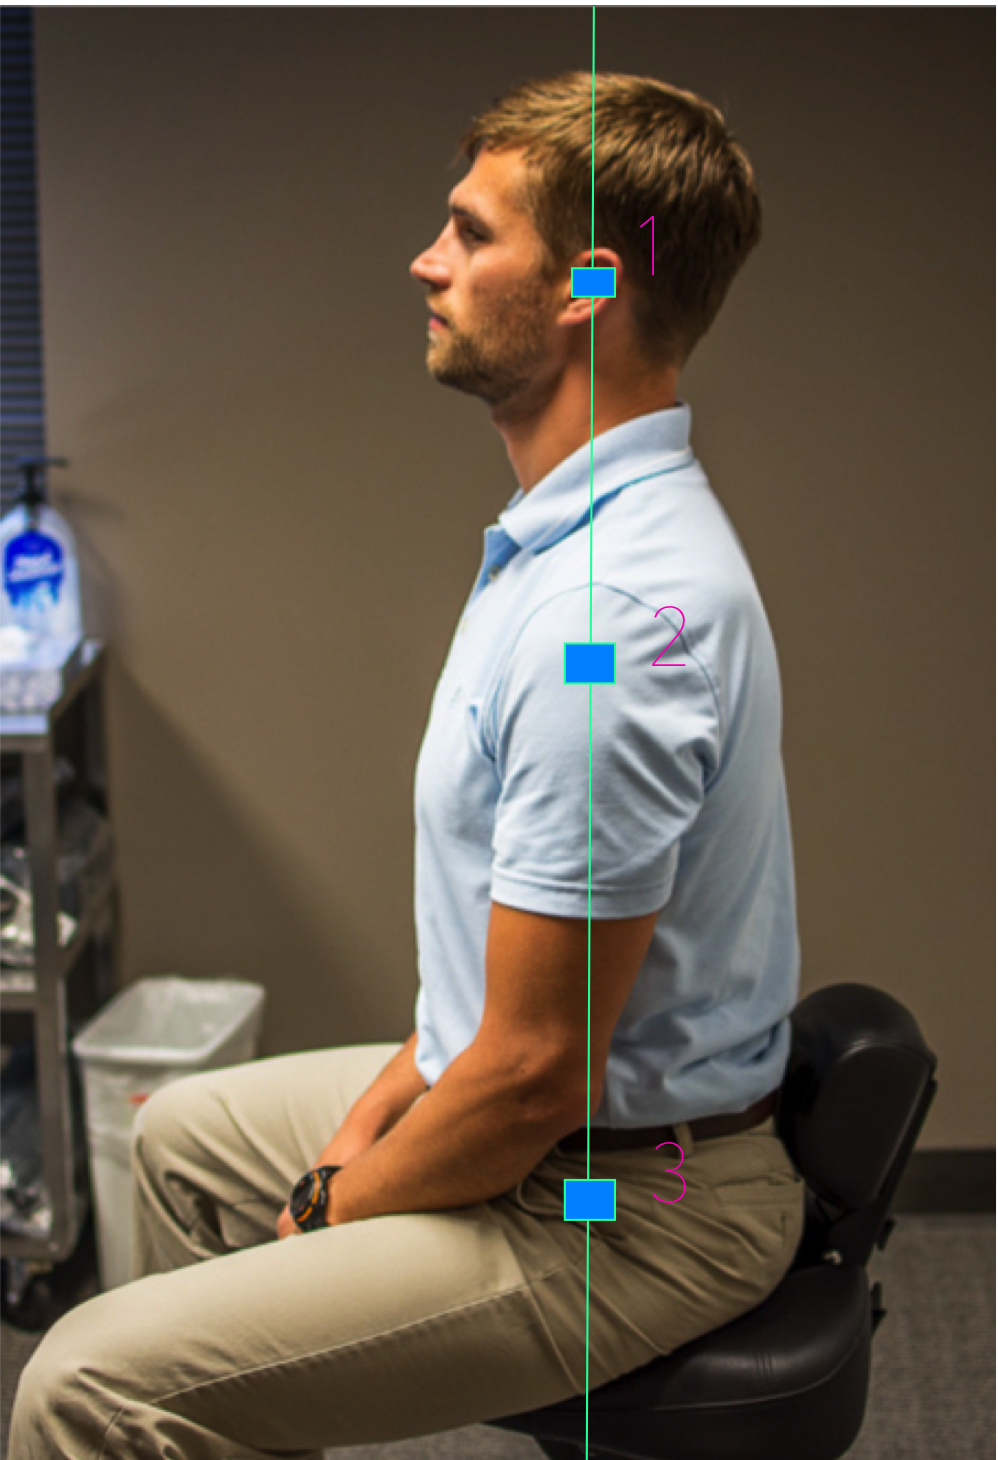
1. External Auditory Meatus (entrance of ear canal)
2. Midway through the shoulder
3. Slightly posterior (behind) the center of the hip joint
4. Slightly anterior (in front) of the axis of the knee joint
5. Slightly anterior (in front) of the lateral malleolus (plumb line reference)
***The other alignment points are not included as they are difficult to identify without proper training. Additionally, there is a desired curvature of the cervical, thoracic and lumbar areas of the spine. We will discuss this further in future posts. For now assess overall posture as it relates to gravity.
Front & Back View Assessment
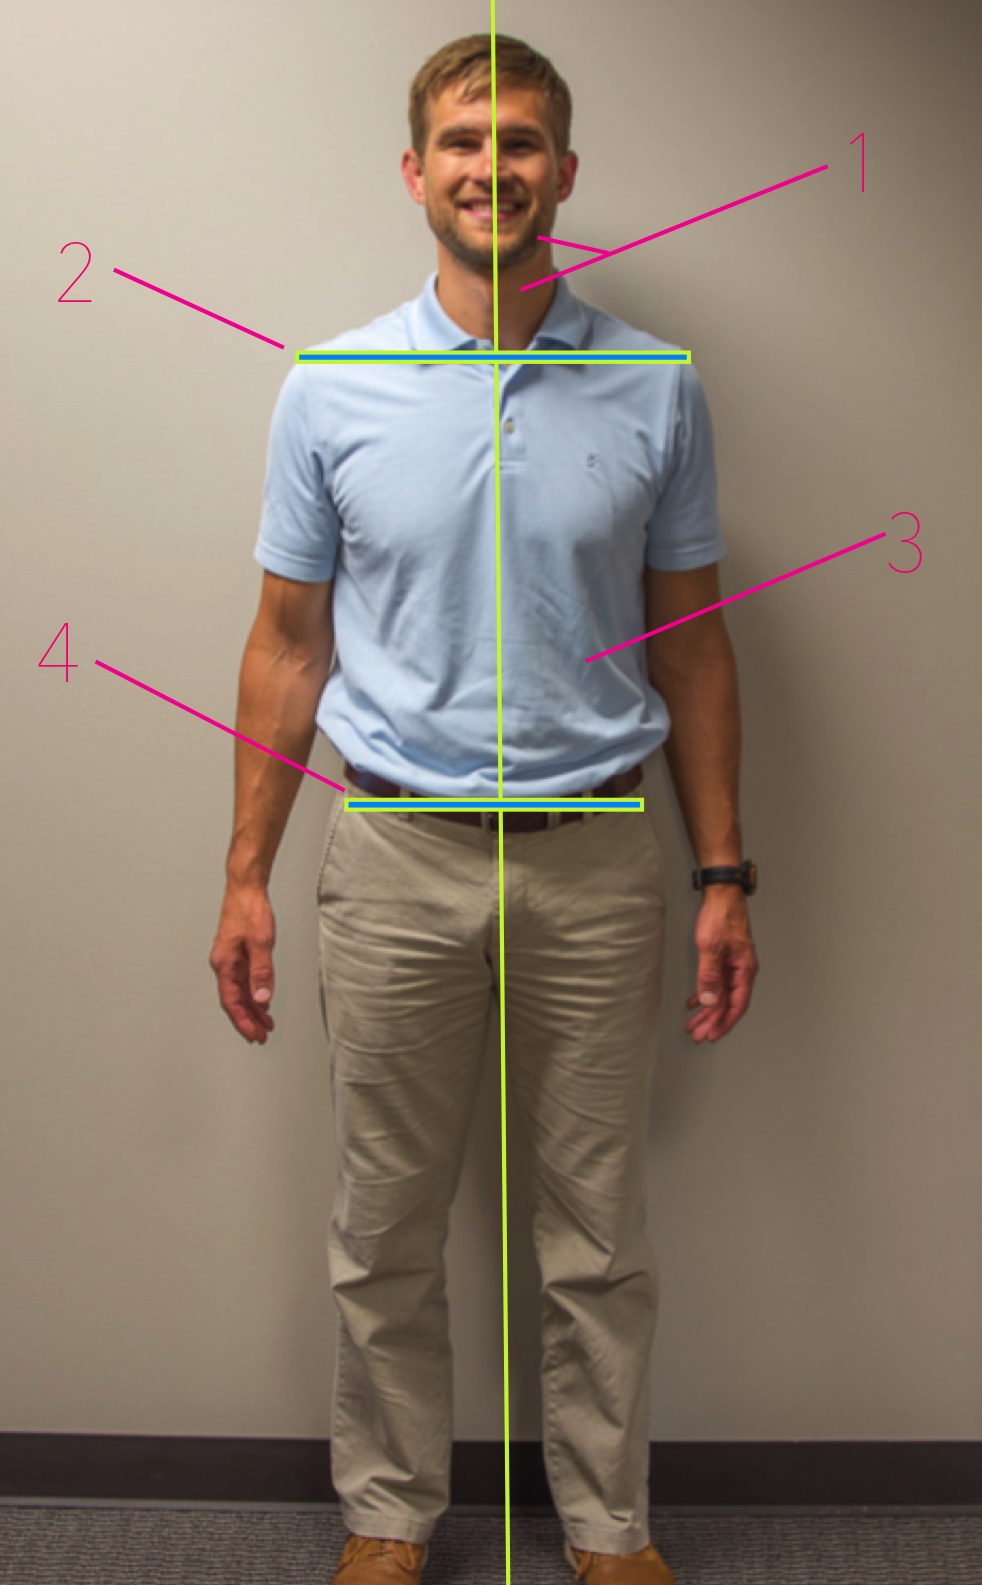
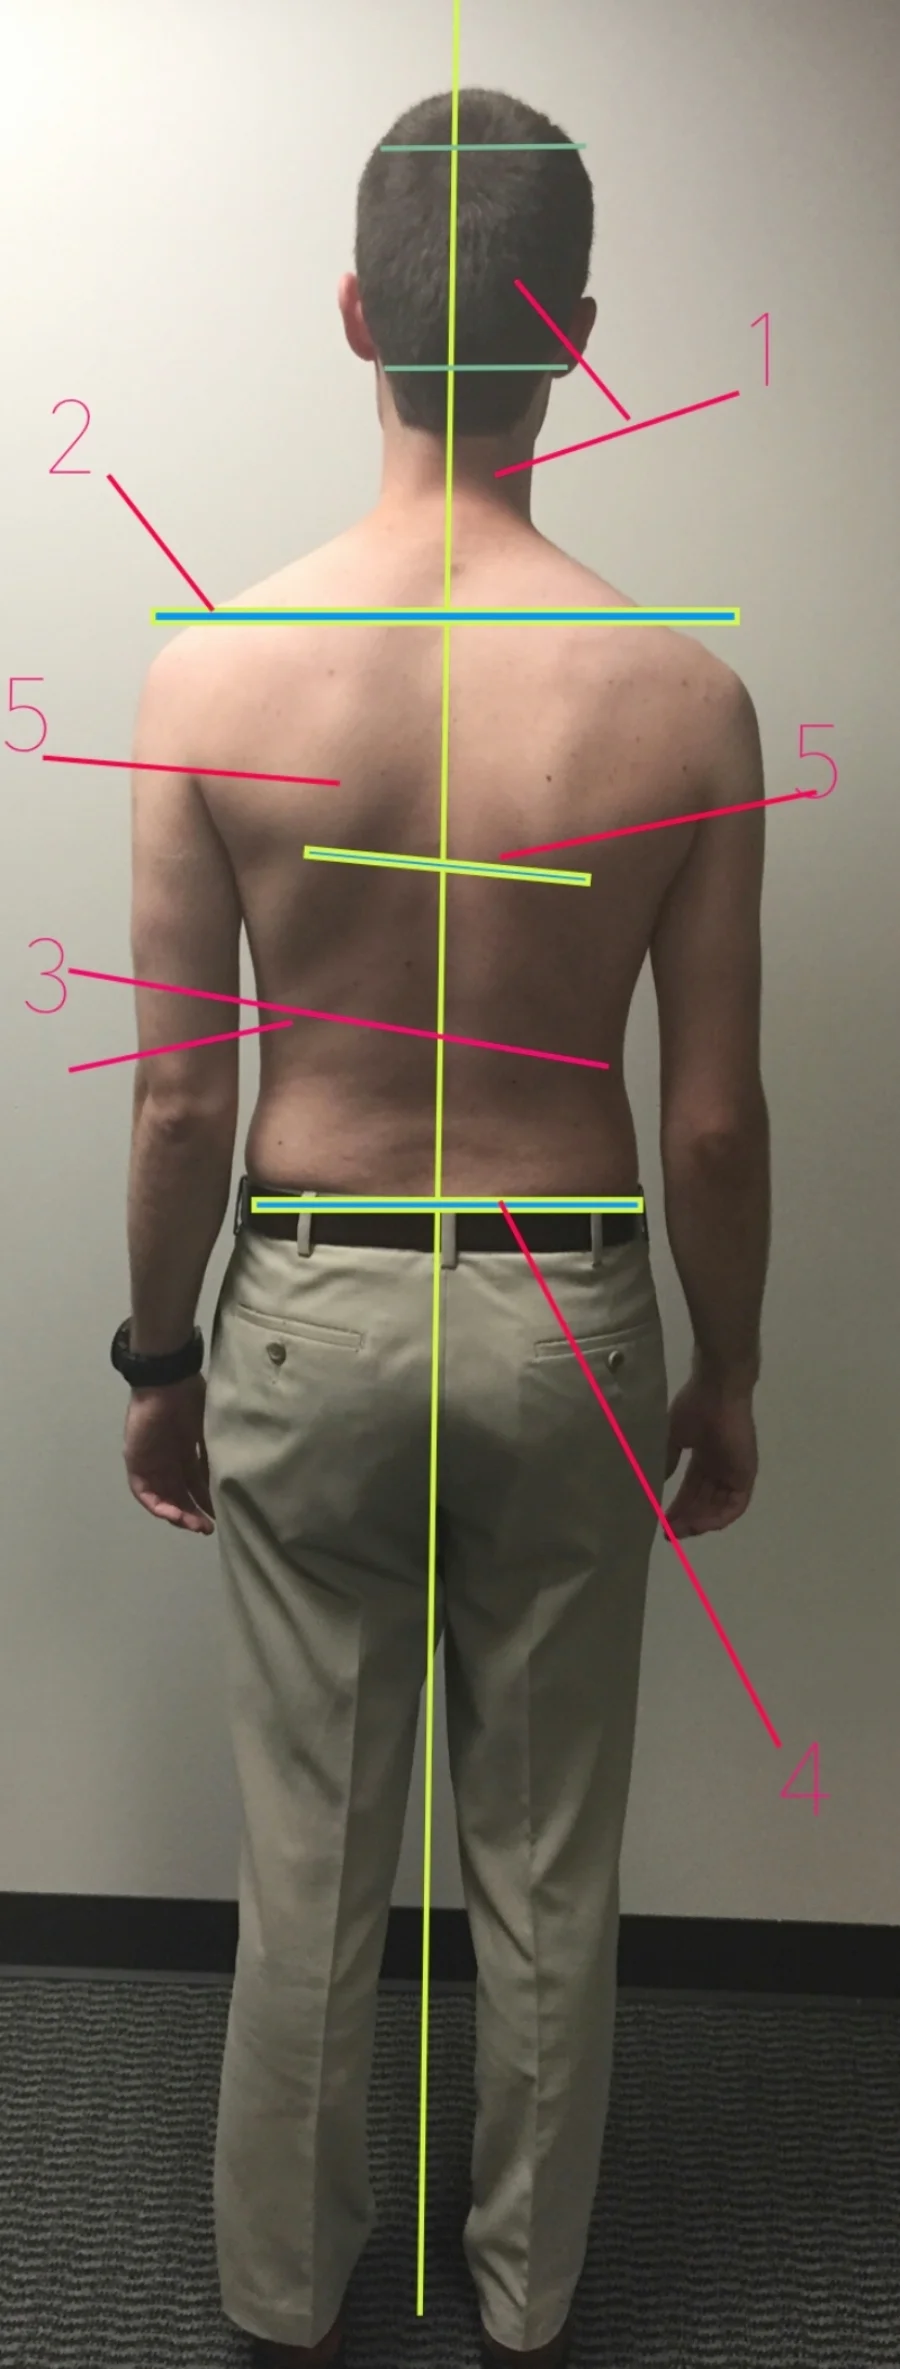
- Check the relationship between your head and neck.
- Does your head tilt to one side.
- Possible upper cervical restriction
- Does your neck lean to one side?
- Possible mid to lower cervical restriction
- Is your head to centered over your neck?
- Various restrictions possible
- Does your head tilt to one side.
- Check the relationship between your shoulders.
- Are they level
- Do they jut out more on one side? Meaning is there more of your chest and shoulders on one side compared to the other?
- Possible shoulder or thoracic restrictions
- Check the symmetry of the curves of your sides. Use your umbilicus (belly button) for a reference point if possible.
- You have to look close for this one but it can tell us a lot. (scoliosis, functional and/or structural leg length, lumbar dysfunction causing over use of quadratus lumborum, preference of weight bearing on one leg and much more.
- Check to see if your pelvis is level or off center.
- Similar to #3 you can learn a lot about yourself by the plane of your pelvis.
- Check the symmetry of your shoulder blades. If possible look at the borders of each shoulder blade. Is one higher? Tilted? Further from the spine? Are the borders of one shoulder blade more prominent than the other?
- We will stop at the trunk for now. It is important to assess the lower extremities but my goodness look at the time, 30 minutes is almost up.
Self-Assessment in Environment: Day 2-5
- MAKE IT ROUTINE: Now that you know where "there" is start to assess how you interact with your environment. Be mindful during daily standing activities such as waiting in line at the grocery store, cooking, brushing your teeth etc. Where do you need to improve?
- SIT/STAND RATIO: Once you know how junkie your standing posture is check out the ratio of sit/stand time.
- SLEEP STANDING UP: If you are sleeping with your chin jutted forward resting on your fist and knees in your stomach you are essentially sitting all night. We typically sleep in the position we are in most throughout the day. If this is you then consider a standing desk to unwind your sticky joints and soft tissue during the day. If you want to tolerate a better sleep position you need to create a better environment for your posture during the day. I gave you 2 days to either order a standing desk or come up with a solution. (see below for a standing desk and free DIY solution)
- SIT WELL AND MOVE OFTEN: If a standing desk is not an option for you then take up some other good strategies to improve your resting posture while you sit, work and focus. Move your body every 40 minutes, period.
- BE A GOD or GODDESS: This seems simple and boring but if you continue to water your dysfunctional-onion all day and night then do not expect to be a performance god or goddess on the #singletrack rock gardens.
Self-Assessment Final Steps: Day 6
- Pay attention to the position of your pelvis in sitting and standing
- Anterior, posterior and neutral
- Determine if you are sitting evenly on both ischeal tuberosities (sit bones)
- Do you stand with more weight on 1 leg?
- How often is your head dropped to look at your phone or other device?
- How often are you sitting with your legs crossed? Or one leg tucked under the other?
- How do these positions relate to your plumb line comparison?
Awareness: Day 7
- Be mindful of what you learned Day 1-6. This is the calorie-counting equivalent of postural perfection.
- What is hard and what is easy?
- What are the barriers for you? Does your job require insane amounts of focus?
- Do you feel the need to dirty slump with your nose touching the monitor?
- Is your couch a hammock?
- Do you need to set an alarm to get your hind-end up every 40 minutes?
2. Get There
Self Assessment Continues
Mobility
Once you identify if you are "there" you can start to understand where you are falling apart, I mean off track. Now we get to have some fun working on your sticky bits. You know me better than to think I would give you these juicy nuggets too early.................... stay tuned to next week.
3. Stay There
Stability Introduction
Postural Endurance
4. Stay There Under Load
Stability
Postural Endurance
Motor Control
5. Stay There While COG Changes
Proprioception
Mobility (beyond the neutral static posture)
Stability
Motor Control
Strength
Endurance
6. Go Ride a Bike!
While you hold it all together, of course.